-->

03 December 2012

Solved Error: ORA-12154: TNS:could not resolve the connect identifier specified


vj
Solved Error: ORA-12154: TNS:could not resolve the connect identifier specified

Here I am going to discuss about the specific error”ORA-12154: TNS:could not resolve the connect identifier specified” when user tries to connect to the database from 10g FORMS & REPORTS DEVELOPER.The problem can be solved by doing a little work, in a few steps, as illustrated below. 

After installing the oracle developer suite 10g, I tried to connect to the local database(10g) previously installed on my pc,but I end with the error”ORA12154:TNS:could not resolve the connect identifier specified” and can`t connect to the database,it was because when we install the database 10g a net service name “orcl” is automatically created and is used to connect to database through listener,the listener identifies the specific net service name(connect identifier) and establishes theconnection from where it is initialized, but what happen when we try to connect to database through FORMS & REPORTS DEVELOPER SUITE is the listener cannot identify the net service name(connect identifier),because it is being initialized from and by the FORMS & DEVELOPER SUITE ,To solve the problem and to connect to the database there are two ways

1) To Reconfigure the NET SERVICE NAME from the developer suite 10g.
2) To follow the following steps.

STEP 1
Navigate to the path where you installed database 10g >oracle>product>10.2.0(version)>db_1>network>admin

Eg: C:\oracle\product\10.2.0\db_1\NETWORK\ADMIN 
(Note here C:\ is my installation drive) 

There you will find a file named as “tnsnames.ora” copy that file


STEP 2

Navigate to the path where you have installed 10g developer suite>network>admin
Eg: C:\DevSuiteHome_1\NETWORK\ADMIN

and paste the file “tnsnames.ora” 


Then try to connect to the database

Connected

23 November 2012

FREE DOWNLOAD DICTIONARY


WordWeb is a one-click English thesaurus and dictionary for Windows that can look up words in almost any program. It works off-line, but can also look up words in web references such as the Wikipedia encyclopedia. Features of the free version include:


Definitions and synonyms
Related words
5000 audio pronunciations
65 000 text pronunciations

150 000 root words
120 000 synonym sets
Look up words in almost any program
Millions of people from all over the world use this top-rated software.

INSTALL ANY OPERATING SYSTEM VIRTUALLY IN WINDOWS 8 WITHOUT ANY VIRTUALIZATION SOFTWARE


HYPER-V IS A FEATURE OF WINDOWS SERVER EDITIONS AND NOW IT IS INTRODUCED IN WINDOWS 8

Before you start make sure that your machines supports Hardware Server Virtualization and that it has has been enabled in the BIOS

GO TO ->CONTROL PANEL->PROGRAMS->
Once the Programs and Features dialog opens, select the Turn Windows features on or off link on the left hand side.
sshot-3
When the Windows Features open, check the Hyper-V option. Then click Ok.
sshot-8
Windows will now add the Hyper-V binaries to your Windows installation.
sshot-7
To begin, just press the [Windows] key to bring up the Start Screen. Then, type Hyper and press [Enter] when Hyper-V Manager appears
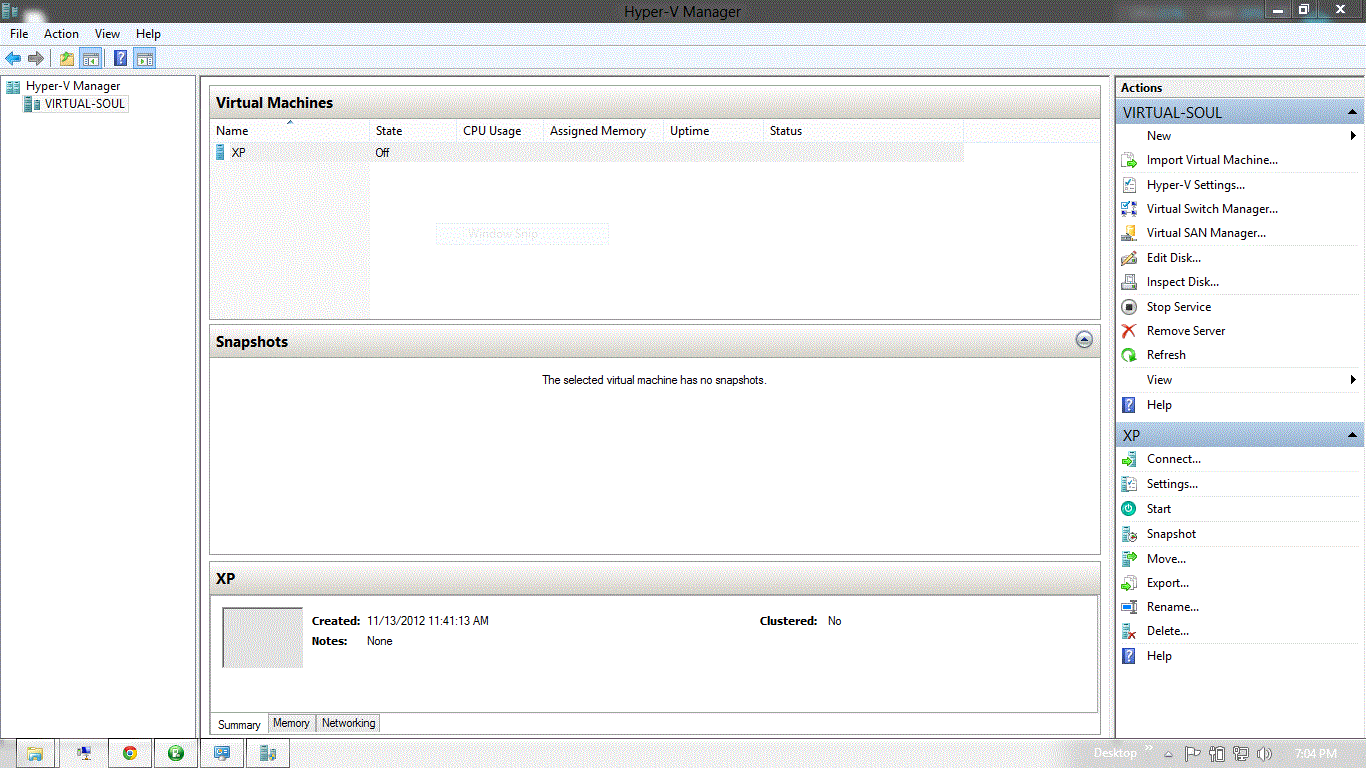
After you launch the Hyper-V Manager, navigate to the Actions pane and select the New | Virtual Machine command. When the first screen of the New Virtual Machine Wizard appears, just click the Finish button
When you see the new virtual machine appear in the Virtual Machines list, right click the name and rename it to something like XP Virtual Machine, then go back to the Actions pane and click the Settings command
When the Settings window appears, you’ll see that there are a multitude of settings that you can configure to customize how your virtual machine will work. For the purposes of this article, I’ll just cover the basic settings that you need to get started with your Windows XP virtual machine.
Because Windows XP is an old operating system, it isn’t compatible with Hyper-V’s network adapter. As such, the first thing that you will need to do is add a legacy network adapter. Select the Legacy Network Adapter item and click the Add button.

When you do, Hyper V will add the Legacy Network Adapter to the Hardware list and immediately take you to that section. Since I already created a virtual switch for my last article, I’ll select the Test 1 Virtual switch from the virtual switch drop down Then, click Apply to save your changes. If you haven’t already set up a Virtual switch for the Network Adapter, you can do so at any time.
Now, move up the Hardware list and select the Memory section. I’m going to specify 1GB of RAM for my XP Virtual Machine. As you can see , I’ve specified 1024 in the Startup RAM text box and left the Enable Dynamic Memory check box unselected. Even though the text box is titled Startup RAM, in the case of the Windows XP operating system, this will be the total amount of available RAM.
In other words, it will essentially be static memory. Being an older operating system, Windows XP is not supported by Hyper-V’s Dynamic Memory feature, so you’ll need to leave that check box unselected. The Memory Weight slider is designed to allow you to prioritize memory usage but it is related to the Dynamic Memory feature and so in the case of Windows XP we’ll just leave it as it is in the middle.
To continue, go ahead and click Apply to save your settings. Then move down to the IDE Controller 0 | Hard Drive section.
When you arrive at the Hard Drive section, as shown, the only thing that you may want to do is increase the size of the hard disk. By default, the hard disk is set to 127GB in size. For this example machine, I want to increase the size of the hard disk to 500GB. To do so, click Edit button.
Installing Windows XP : 
Installing Windows XP in a Hyper-V virtual machine is easy. To begin, insert the Windows XP CD in the drive, go back to the Actions pane in the Hyper-V Manager, scroll down to the virtual machine section and click the Connect command. When you do, you’ll see a virtual machine window that tells you that the machine is turned off. At this point, just click the Start button on the menu bar, as shown 
Click the Start button on the virtual machine window’s toolbar.
You’ll then see the installation begin the Windows XP Setup screen.

Seeing the basic looking Windows XP Setup screen in Windows 8 is quite a stark picture.
Once the installation is complete, you’ll see the Windows XP desktop in a virtual machine in Windows 8, as shown 


08 November 2012

TOAD Connection Error:- "ORA-12154 TNS:could not resolve the connect identifier specified" or "ORA-06413: Connection not opened" or "Can't initialize OCI. Error -1" Solved

Tool for Oracle Application Development

Error connecting to database after installing on Windows 64-Bit OS


Problem Description

Any of the following errors can occur when attempting to connect to an Oracle database when installed on a Windows 64-Bit OS:

"ORA-12154: TNS: could not resolve the connect identifier specified."

"ORA-06413: Connection not opened"
"Can't initialize OCI. Error -1"

Cause

 
This could be caused by an Oracle 10g client defect on Windows 64-bit. Oracle 11g is not affected. According to Oracle Metalink, Doc ID 334528, there is a network issue for any application that is installed into a path with a parenthesis using the 10g client on Windows 64-bit.
For example, C:\Program Files(x86)\Quest Software\

Resolution

RESOLUTION 1:
If you are running Oracle 10g please install your Quest application into 'C:\Quest Software' and not 'C:\Program Files (x86)\Quest Software.'
Note: If you are trying to install Toad into 'C:\Program Files\Quest Software', Windows will detect it as a 32-bit Program and install it back to 'C:\Program Files (x86)\Quest Software'
RESOLUTION 2:
If you want to keep your install into C:\Program Files (x86)\ Quest Software, then upgrade your client to Oracle 11g 32-bit as the issue is resolved there.
Note: Toad 10.1 to Toad 11.0.1 does support Windows 64-bit but the Oracle client still must be 32-bit.

Even after you have done the above things sometimes you will get the below error on WINDOWS 7 & WINDOWS 8 64BIT Pcs.
"Can't initialize OCI. Error -1"

Then do the following things:

Right click on the Toad shortcut -> Go to -> Compatibility Mode -> check the box -> Run this program in compatibility mode for "Windows XP(Service Pack 3) & check the box -> Run this program as administrator.

In most cases problem will be Solved


02 November 2012

WINDOWS 8 MOST USEFUL SHORTCUTS


  • Press (Windows) to enter the tiled Start screen.

  • (Windows) + M minimizes everything that's showing on the desktop.

  • (Windows) + E opens Explorer for quick access to folders.

  • On the Start screen, press (Windows) + D to instantly get to the desktop.

  • (Windows) + Tab opens a list of currently running programs.

  • (Windows) + Print Screen takes a screenshot and saves it in a Screenshots folder nested in your Pictures folder. 

  • To take a screenshot on a Windows 8 tablet, simultaneously press the Windows button and the volume-down button on the tablet chassis.

  • (Windows) + Q opens a global search menu. Type what you're looking for and where you would like to look.

  • (Windows) + W opens a search in your system settings to quickly locate and change system properties.

  • (Windows) + F opens a file and folder search.

  • (Windows) + Pause opens the system properties page to show you a quick rundown of your specs.

  • (Windows) + "," (that's the comma sign!) makes all current windows transparent, giving you a peek at the desktop as long as you hold down (Windows).

  • (Windows) + "." (the period) snaps a window to the right or left side (toggling each time you press ".").

  • (Windows) + R prompts the Run commanduseful for quickly launching apps and other routines with a command prompt.

  • (Windows) + X opens the Quick Access Menu, exposing system functionality such as the Command Prompt, Disk Management, File Explorer, Run, and more. It's perfect for people who Start Menu. 

  • Alternately, you can right-click on the bottom right corner of the screen to spawn the Quick Access Menu.

  • (Windows) + I opens the settings menu, giving you quick access to the Control Panel, Personalization, and your Power button, among other features.

  • (Windows) + O locks orientation on devices with an accelerometer.